
GSP - Risk


When it comes to managing organisational risk, who sees what - and who can do what - is just as important as the risks themselves. That is where GSP - Risk permissions come into play.
Whether you are in local government, finance, healthcare, or beyond, setting up the right permissions ensures accountability, compliance, and control across all risk records. In this guide, we will walk you through the two types of permissions, show you step-by-step setups, highlight use cases across industries, and finish with handy tips and tricks to get the most out of your GSP - Risk configuration.
GSP – Risk uses a dual-permission structure to give you complete control:
1. Standard Roles
These are pre-configured permissions applied by default within your system’s settings. They’re tied to the responsibilities users hold on specific records, for example, as a Risk Owner or Action Owner.
Use case: You want a Risk Owner to edit risks but not add new controls — no problem, simply untick that ability in their standard role settings.
2. Role Management (Flexible Permissions)
These are custom-built roles you can create, edit, and delete — linked to specific hierarchies, business units, or departments.
Use case: A Finance Risk Manager should only see risks under the “Treasury” unit — easy to set up via Role Management with hierarchical node restrictions.
Want to see these two permission types in action? Watch this on demand webinar walkthrough (00:48 – 02:20) to understand the distinctions and real-world applications.
To know more about the technical differences between static and flexible permissions, refer to the GSP – Risk Permissions and Staff Management Release Note – Sections 2 and 3.
Step-by-Step Setup for Standard Roles:
1.Go to the mega menu in GSP – Risk.
2.Navigate to: Risk Settings > Standard Roles.
3.You will see a list of system-defined roles (e.g., Responsible Officer, Risk Owner).
4.Click on Edit for any role to configure permissions.
5.Tick/untick the abilities like:
Example: Amanda Scott is assigned the role of Responsible Officer for a risk. By default, this role allows her to edit and assign actions. However, if the “Add Actions” permission is unticked in her role settings, that functionality will be disabled.
See a live demo of restricting Amanda Scott’s role permissions in this webinar segment (06:22 – 07:00), showing how to prevent specific actions like adding new controls or actions.
To understand how permissions affect risk approval workflows, refer to the “Risk Preparer” and “Risk Approver” notes in the “Risk Preparing and Approving” section. This outlines the specific visibility and editing rights granted at each stage of the approval process.
 Fig 1.0: The Standard Role screen displays predefined roles and their statuses. Use the Edit button to configure individual permissions for roles such as Risk Action Owner or Risk Confidentiality Owners.
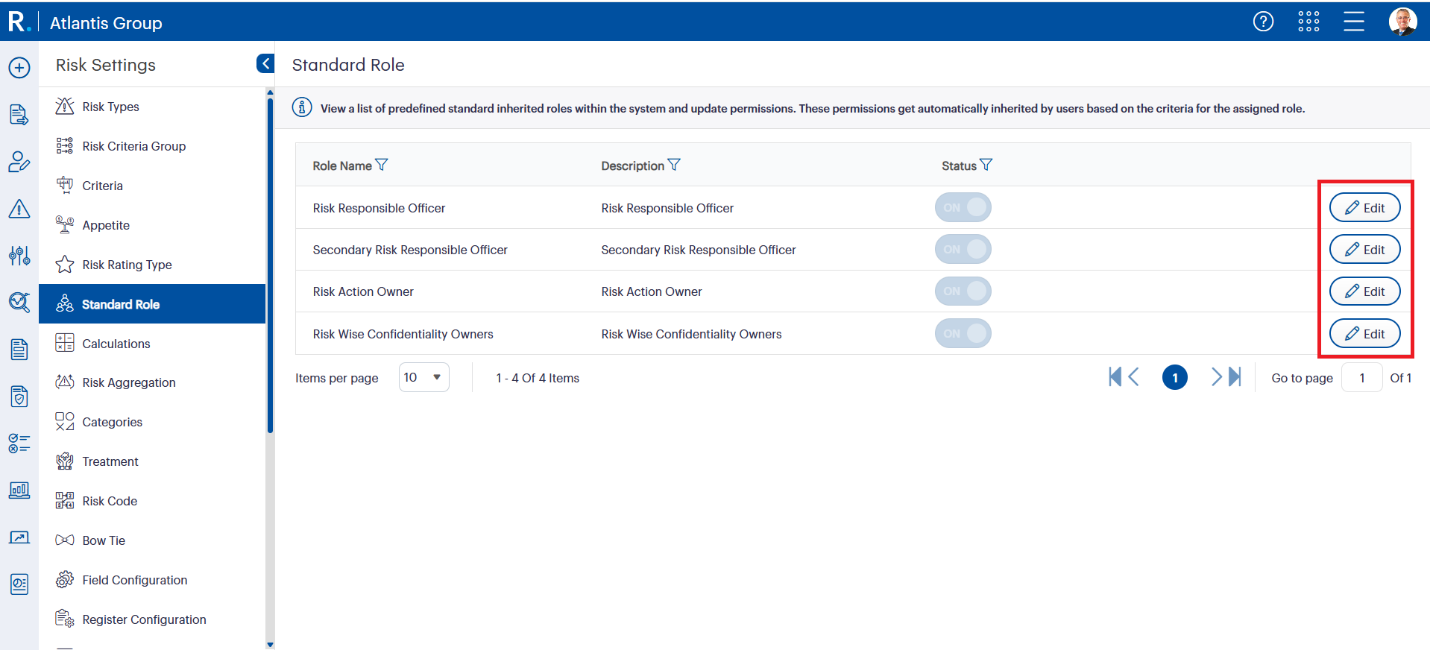 Fig 1.1: Click the ‘Edit’ button next to any predefined role to customise its access level. You can enable or disable key actions such as adding risks, controls, or assigning responsibilities.
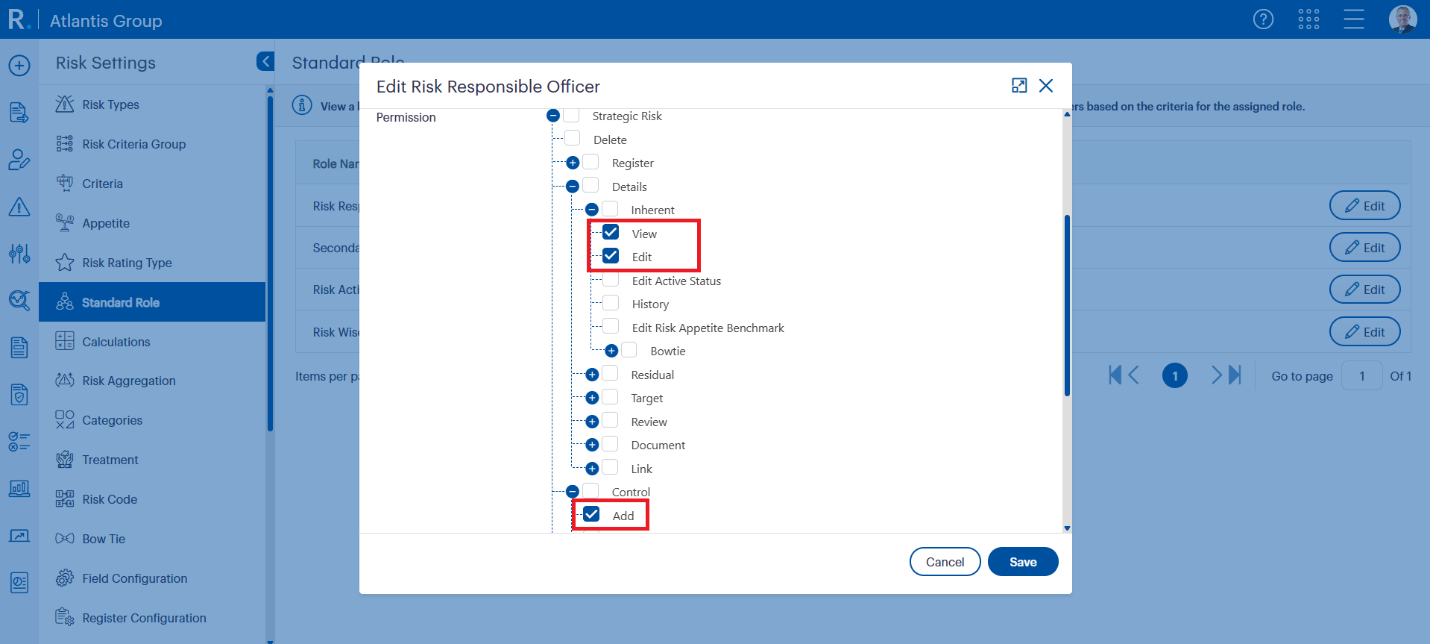 Fig 1.2: Fine-tune access for each role by enabling or disabling specific actions. In this example, the Responsible Officer role is granted permissions to view and edit the Inherent Risk Assessment and add relevant controls to the risk record.
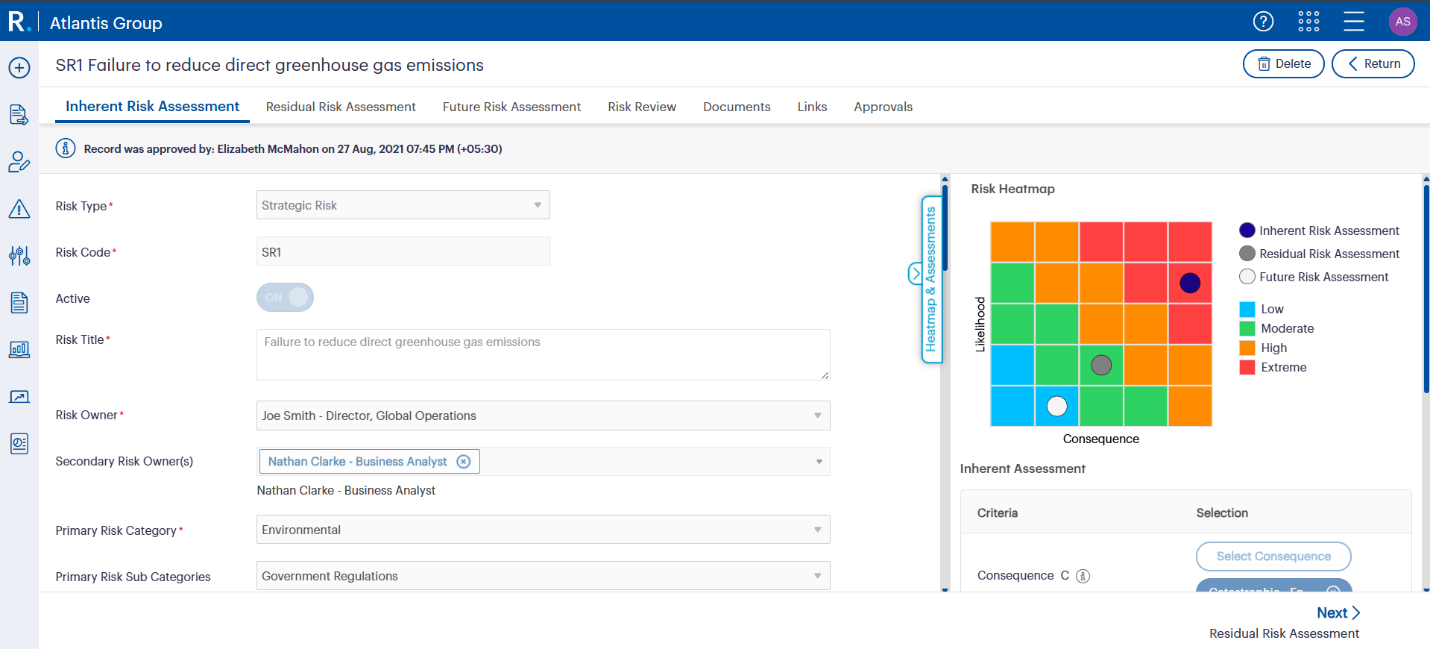 Fig 1.3: This sample risk record shows assigned Risk and Secondary Risk Owners, as well as a visual heatmap for Inherent Risk Assessment. Permissions assigned to these users determine which fields they can view or edit, including status toggles and risk details.
Role Management lets you define permissions with more granularity.
To access Role Management:
To create a new custom role:
Pro Tip: Assign multiple roles to the same user at different levels for hybrid access (e.g., edit rights in one department and view-only in others).
For a hands-on walkthrough of assigning Amanda Scott to a specific hierarchy node using Role Management, check out this webinar example (08:55 – 10:32).
To explore the full set of permission options available in Role Management — including Strategic, Operational, and Project Risk – refer to Section 3: Risk – Flex Permissions in the Release Note.
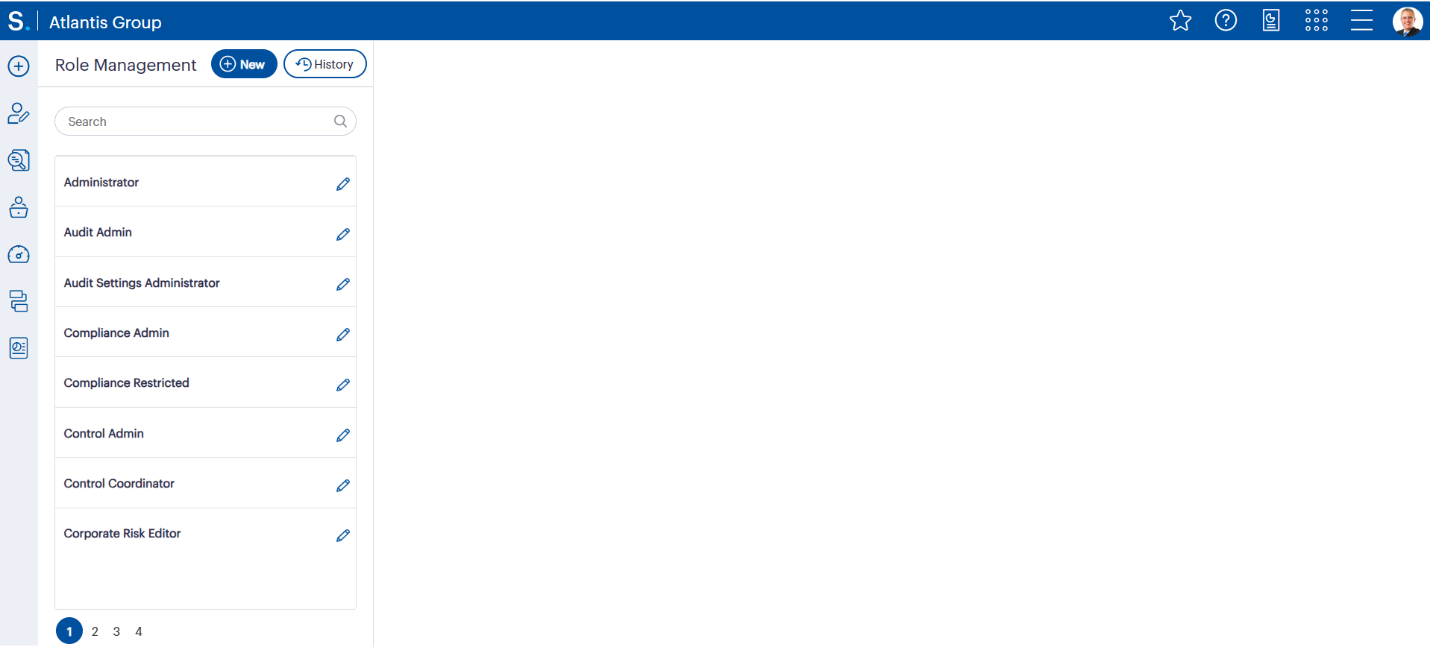 Fig 2.0: This image illustrates custom roles within Role Management, where administrators can create or modify permission sets tailored to specific business units or hierarchical levels.
 Fig 2.1: Define role-specific permissions across different risk types, planning hierarchy, reports, and administration settings. This screen appears when setting up a new custom role under GSP - Risk.
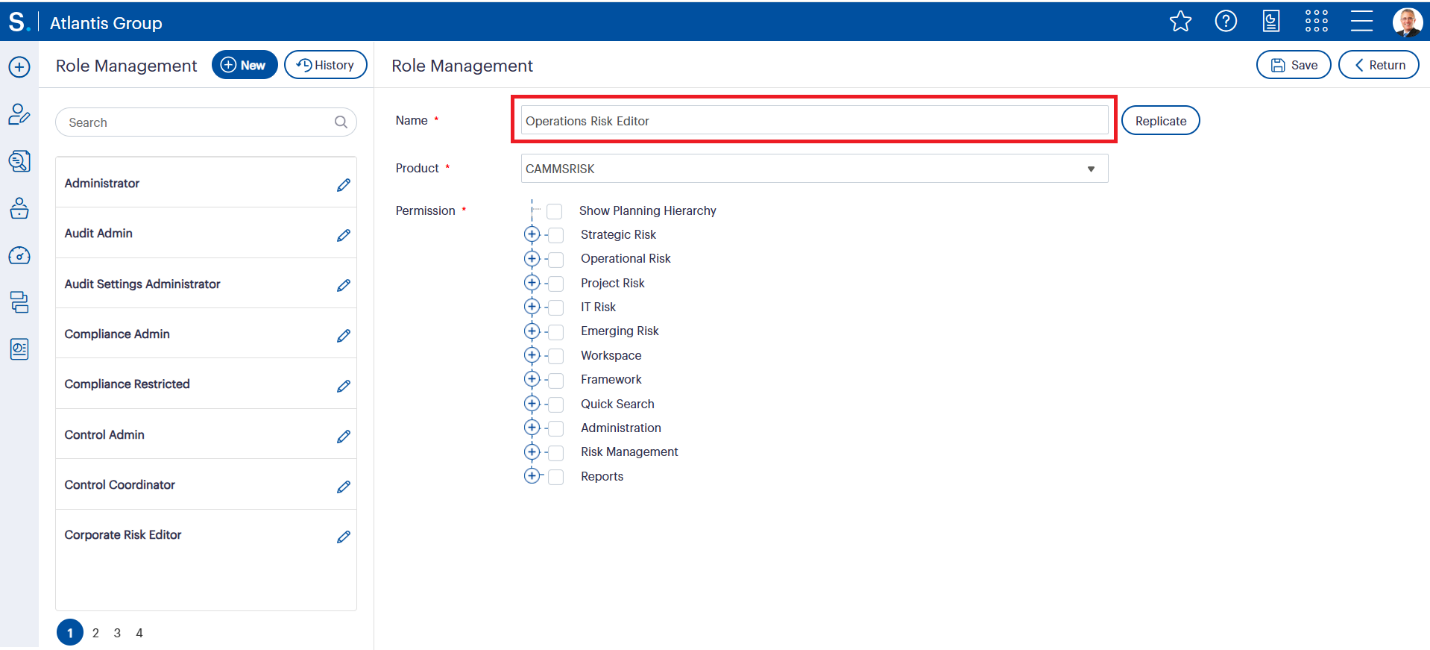 Fig 2.2: Each custom role must be clearly named to reflect its purpose. In this example, a new role titled ‘Operations Risk Editor’ is being created for users responsible for managing operational risk records.
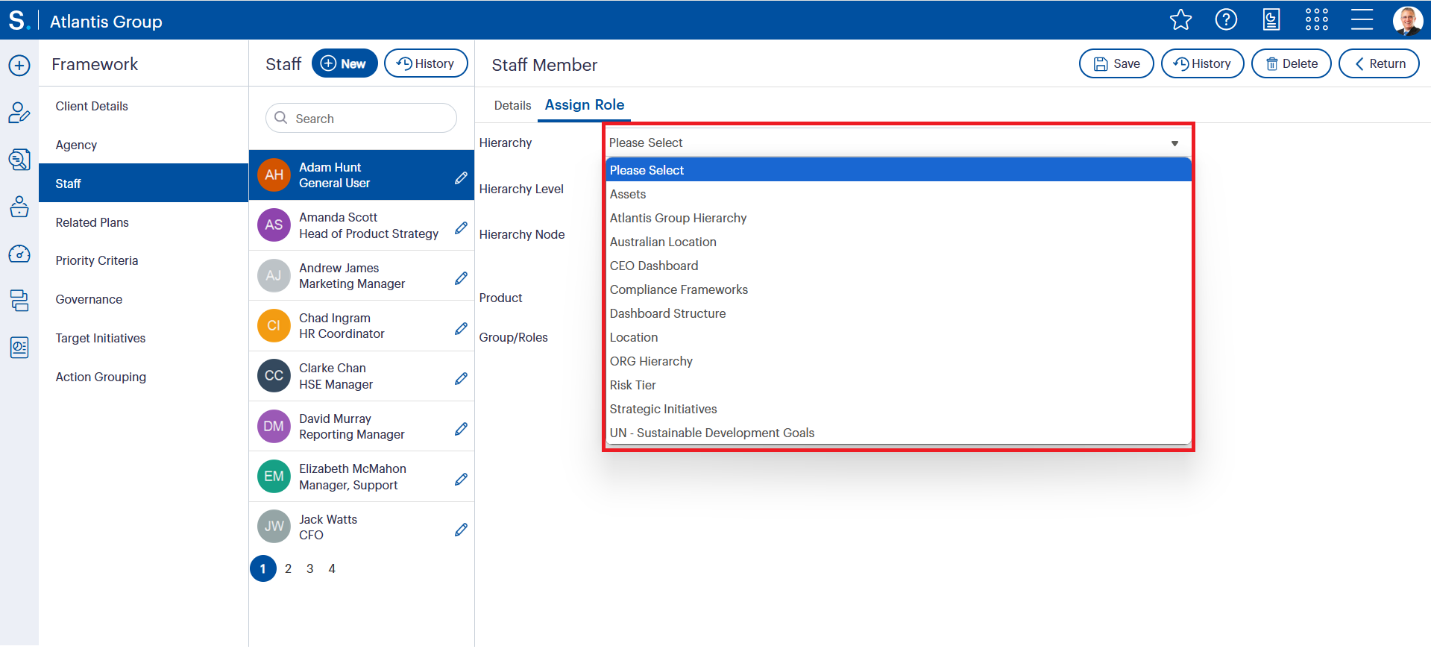 Fig 2.3: Assign roles to users based on organisational hierarchy. Here, the system allows selection of the appropriate hierarchy node (e.g., Location, Risk Tier, Strategic Initiatives) for assigning targeted role access to Adam Hunt.
 Fig 2.4: Set precise visibility levels for risk records using hierarchy-based options — such as “View Node Only” or “View Node with Children.” This ensures users access only what they are responsible for.
Local Government
Pain Point: Risk Officers need visibility across the council but should not edit records outside their division.
Solution: Assign ‘View Node Only’ permissions for broader insight and full access in their own division.
Finance
Pain Point: Auditors need to see confidential risk items but should not change or comment on them.
Solution: Use Standard Role permissions to enable risk-wise confidentiality, granting auditors view-only access to confidential risk items while restricting editing and commenting capabilities.
Healthcare
Pain Point: Clinical Risk Managers should preview draft risks awaiting approval.
Solution: Enable “Show Risk Prior to Approved Stage” permission to give them filtered visibility of unapproved records.
These scenarios are discussed in depth in our GSP – Risk Permissions webinar (starts at 10:40), where roles are tailored to specific business units and user responsibilities.
For step-by-step configuration of this visibility, see the “Risk Preparing and Approving” section in the Risk Approval documentation — it details how approval status (Draft, Submitted, Resubmitted, Rejected) affects what different users can see based on their role.
1. Field-Wise Permissions
Restrict access to specific fields even if the user can see the full record.
Use Case: Amanda (Risk Manager) should not edit the “Active Status” or “Risk Appetite Benchmark”.
How to Configure:
See how Amanda’s field-level access is restricted in this webinar clip (15:50 – 16:50), ensuring she cannot modify specific risk fields.
To explore field-level configurations, confidentiality access, and visibility permissions by risk stage, refer to Section 3 (Risk – Flex Permissions) and Section 2 (Risk – Static Permissions) of the Release Note for a comprehensive breakdown.
 Fig 3.0: With Role Management, administrators can fine-tune access to specific fields such as “Inherent Risk Assessment,” “Risk Appetite Benchmark,” or “Documents.” This example shows how to restrict or grant rights to add, delete, and edit key elements within Strategic Risk.
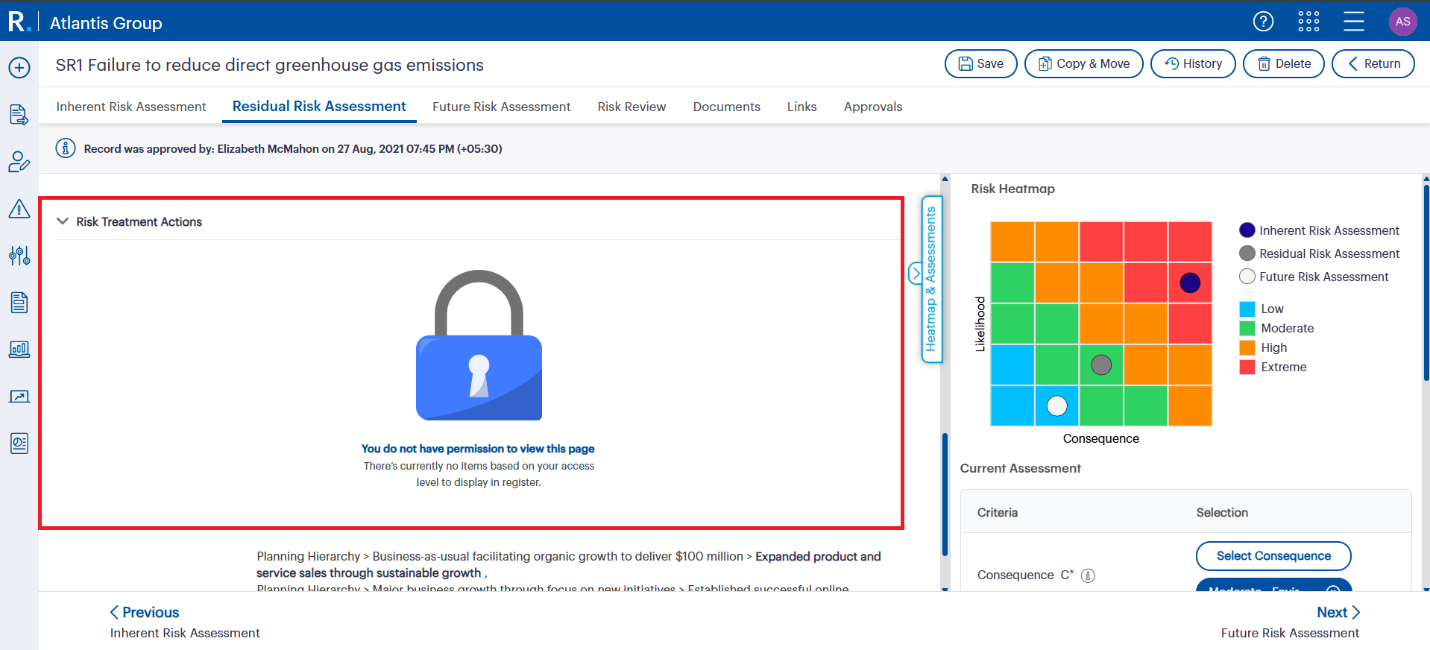 Fig 3.1: This message appears when a user’s role does not have sufficient permissions to view specific risk data, such as actions. Role-based restrictions like this are key to maintaining confidentiality and governance control across sensitive risk information.
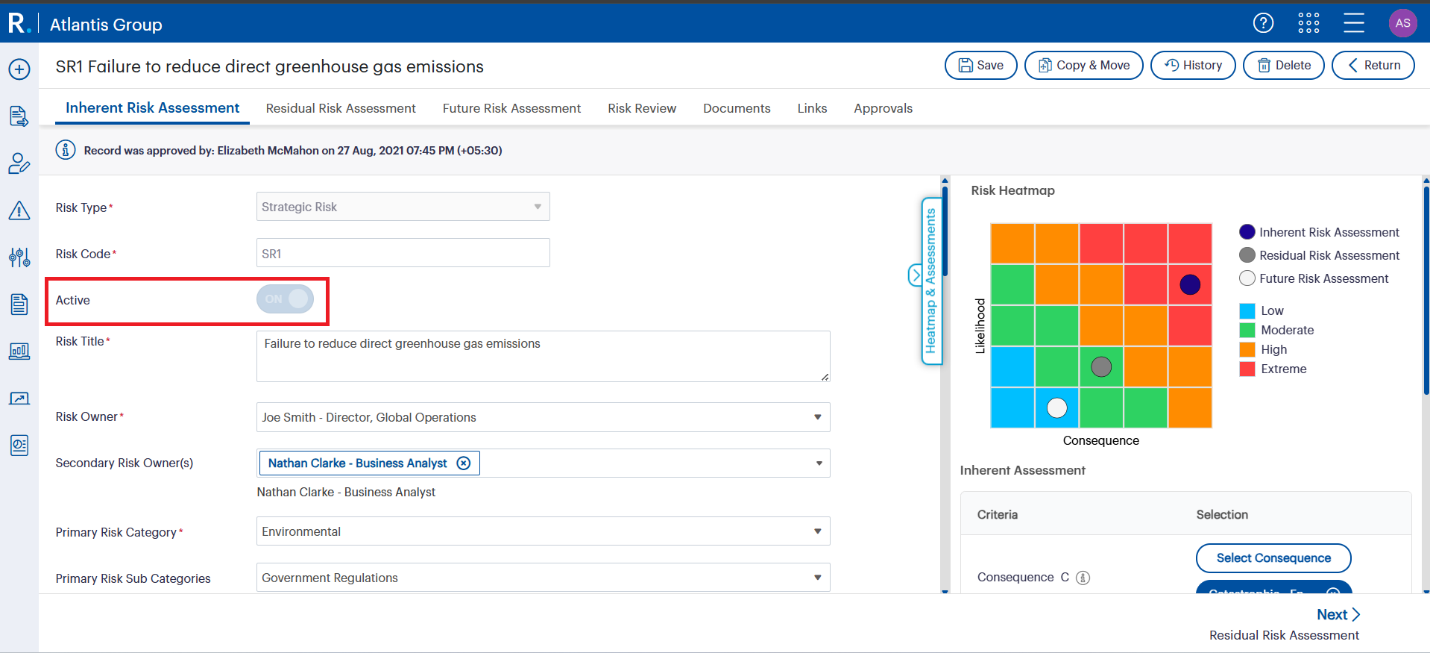 Fig 3.2: The “Active” field can be made read-only or hidden for specific users. In this example, the toggle is visible but greyed out, indicating restricted edit access based on Amanda’s assigned role permissions.
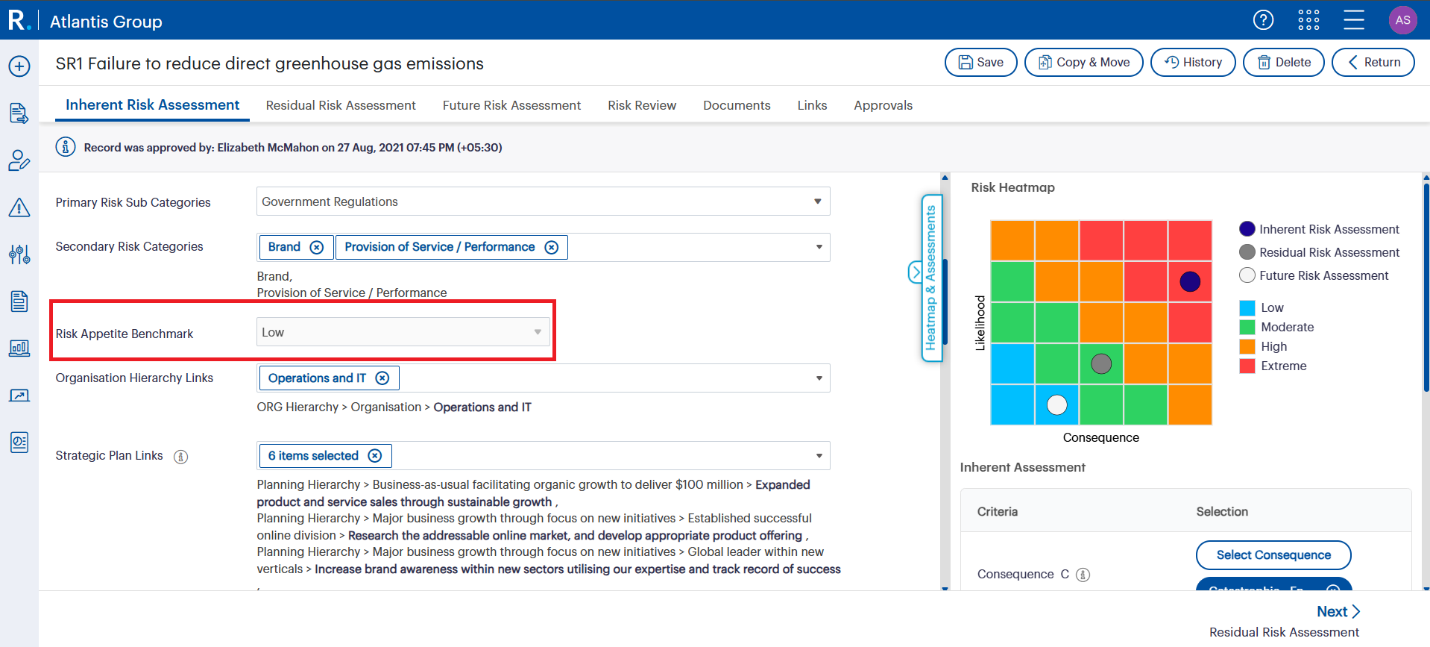 Fig 3.3: The “Risk Appetite Benchmark” field is greyed out for Amanda due to her role’s restricted edit permissions. This helps ensure key thresholds like appetite levels remain controlled by authorised users only.
2. Confidential Risk Visibility
Use Case: Michelle Jones (Project Coordinator) manages emerging risks in EMEA, which are confidential.
How to Configure:
Curious how confidential risks are set up for specific roles? Watch the Michelle Jones use case (17:30 – 20:00) in the webinar.
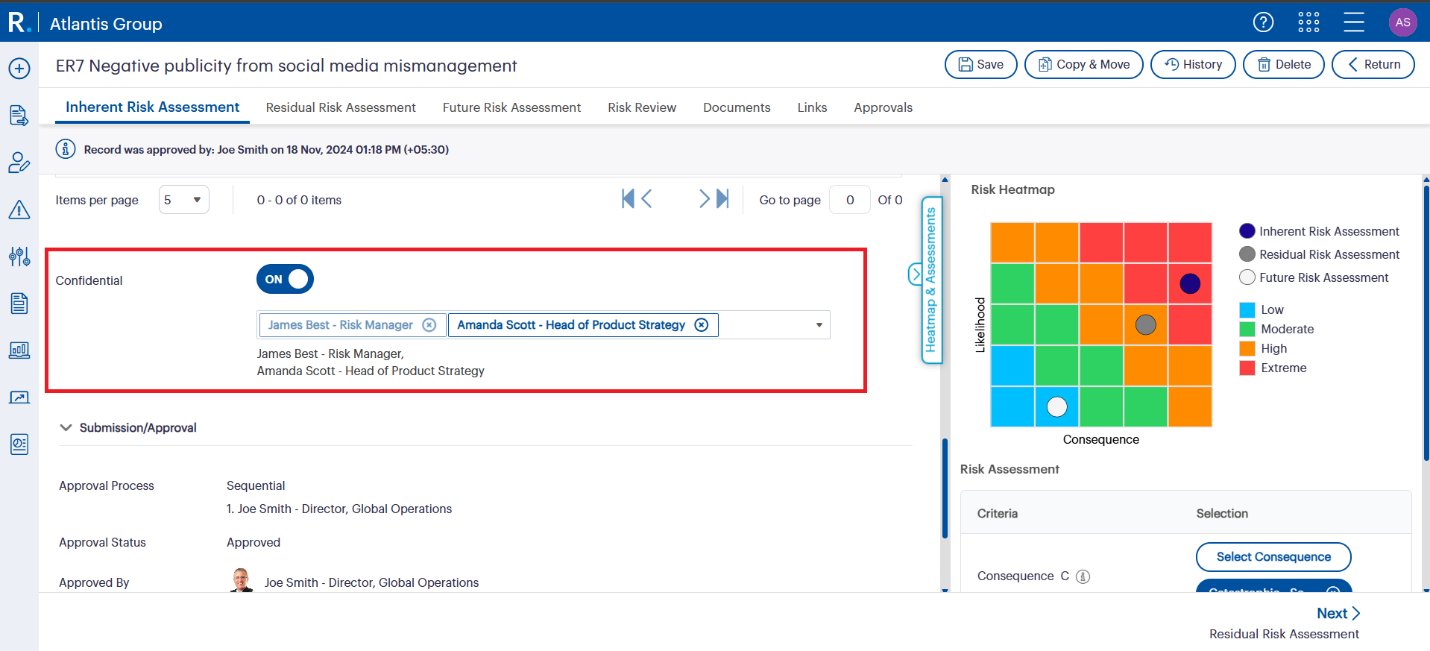 Fig 4.0: By toggling the “Confidential” setting and assigning access to authorised personnel only — like James Best and Amanda Scott — organisations can safeguard sensitive risk data and ensure only selected roles can view and manage it.
3. Show Pre-Approved Risks (Drafts, Rejected, Resubmitted)
Use Case: Adam Hunt (Risk Portfolio Manager) needs visibility into draft risks for operational planning.
How to Configure:
To enable pre-approved risk visibility like Adam Hunt’s scenario, see this practical demo (20:30 – 23:30) in the session.
For a detailed explanation of how preparers and approvers interact with these stages, refer to the “Risk Preparing and Approving” section in the GSP – Risk Approval guide.
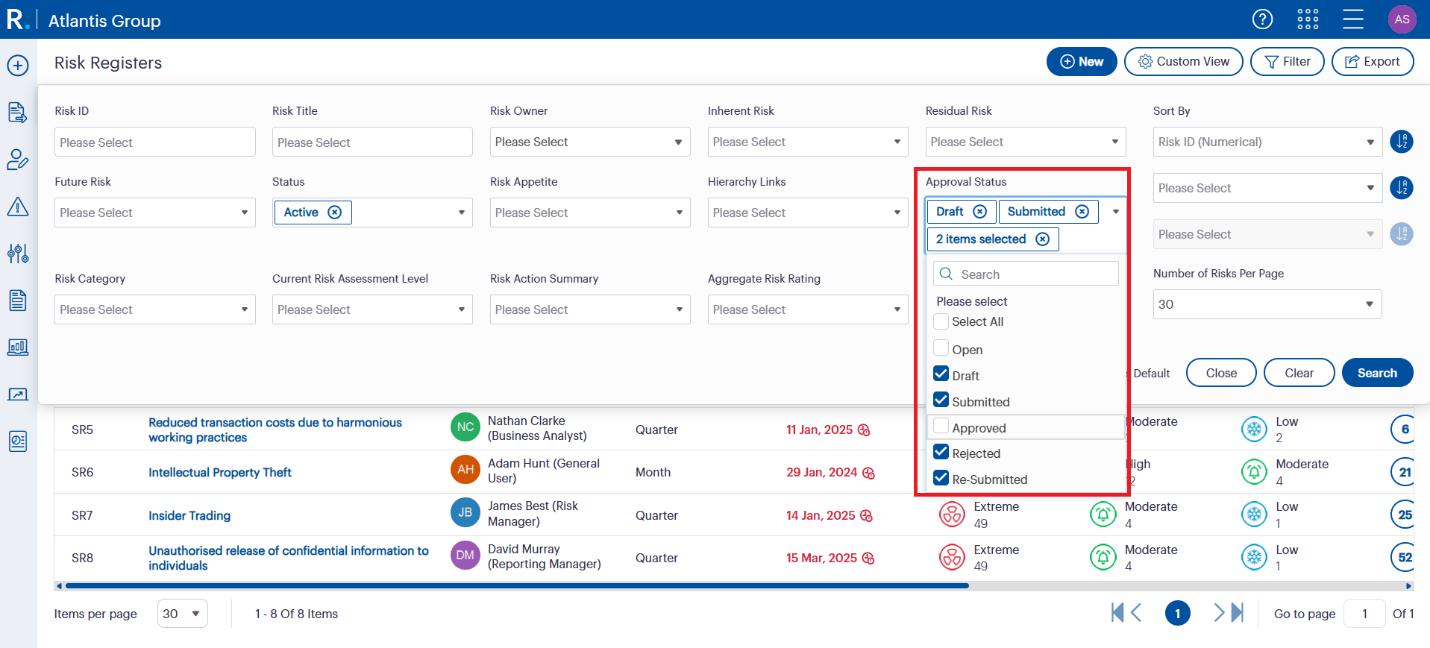 Fig 5.0: The Approval Status filter in the Risk Register enables users like Adam to view draft, submitted, rejected, or resubmitted risks - depending on their role permissions. This supports operational planning and early risk identification.
Permissions are only powerful if they are set up well – and maintained. Riskonnect supports you with:
Whether you are refining your existing structure or setting up for the first time, we can help you build a more secure, streamlined, and compliant risk environment.
Need more hands-on detail? The Risk Permissions and Staff Management Release Note includes comprehensive tables, permission flags, and real-world conditions to support your implementation.
Configure Smart, Operate Securely
Your risk framework is only as strong as the access controls behind it. With GSP – Risk’s dual permission system – from standard responsibilities to flexible role management – you have the tools to build a governance model that fits like a glove.
So, take the time to configure it properly. Your future audits, stakeholders, and regulators will thank you.