GSP - Risk


In governance, risk and compliance (GRC), writing policies or filling a risk register is just the start. The real test is how well those plans translate into daily practice.
The GSP Control Management module (Governance, Risk, Compliance, Strategy & Performance) helps bridge that gap. It treats controls not as a checklist but as a living part of operations that adapt as your organisation evolves.
Controls are your first line of defence. They connect strategy with execution by turning principles into concrete, measurable actions. Without them, even the most detailed frameworks risk becoming little more than corporate wallpaper.
This blog explores how to put controls into practice so they deliver value for your organisation and how that helps you demonstrate impact and build confidence in your role.
At its core, the module lets you identify, monitor, and continuously improve the effectiveness of your organisation’s controls — the processes, actions, and safeguards that prevent risks from becoming costly incidents or regulatory breaches.
Controls in Riskonnect work in two useful ways:
From the release note (Section 1): the module is accessible directly from the left-hand navigation menu, has its own dedicated settings area (for ratings, field configurations, custom lists, and notifications), and allows granular permission settings. You can even make the Control Register your default homepage if controls are central to your role.
Controls aren’t just isolated tasks; they’re the backbone of effective governance. A well-designed and well-operated control can:
Industry Examples:
Local Government:
Finance:
Explore how resilient controls can help meet new APAC financial regulations.
Join our upcoming webinar “Elevating Resilience and Compliance: What’s Next for APAC Financial Services?” to see how financial institutions in Australia, New Zealand, and Asia can meet new standards like CPS 230 and strengthen resilience through practical, scalable strategies.
Healthcare:
Pain point – Strict compliance with HIPAA (US) or NHS Data Security and Protection Toolkit (UK).
Solution – Store master controls for “Access to Patient Records” with centralised ownership but allow ward-level variations in effectiveness tracking. This ensures governance at the top and real-world insight at the operational level.
Mining:
Pain point – Compliance with safety-critical frameworks such as ISO 45001 or ICMM Performance Expectations.
Solution – Master control for “Heavy Machinery Maintenance” linked to different operational sites, with unique per-site control owners and review schedules, reflecting site-specific risks and compliance needs.
Cyber (Information Security):
Pain point – Proving resilience against phishing, ransomware, and insider threats under frameworks like ISO 27001 or NIST.
Solution – Master control for “Multi-Factor Authentication Enforcement” linked across risks such as unauthorised access and regulatory breaches. Incidents where MFA fails can be tied directly to the control, closing the loop between security operations and governance.
Creating Controls
Three ways:
Tip from Our On-Demand Webinar: If your control starts life as an action (e.g., “Implement Multi-Factor Authentication”), convert it to a control once implemented. This keeps your register clean and consistent.
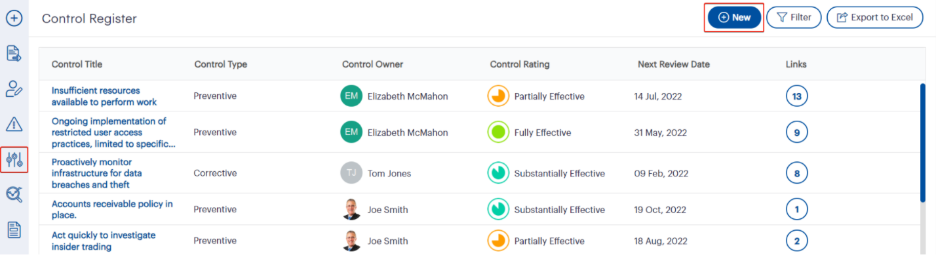 Fig 1.0: The Control Register interface
The Control Register provides a centralised view of all existing controls, showing their type, owner, effectiveness rating, review date, and linked records. From here, you can quickly create a new control using the New button, apply filters to narrow your view, or export data to Excel for reporting and analysis. This interface makes it simple to track, manage, and maintain control records in one place.
Fig 1.0: The Control Register interface
The Control Register provides a centralised view of all existing controls, showing their type, owner, effectiveness rating, review date, and linked records. From here, you can quickly create a new control using the New button, apply filters to narrow your view, or export data to Excel for reporting and analysis. This interface makes it simple to track, manage, and maintain control records in one place.
 Fig 1.1: Adding a new control from the left-hand navigation menu
The left-hand navigation menu offers a quick way to create a new control without navigating through multiple screens. By clicking the + Add New icon and selecting Control, users are taken directly to the Control Details page to enter all relevant information. This method is ideal when you need to log a control on the fly, especially if you are already working in a different module and want to add it without leaving your current workflow.
Fig 1.1: Adding a new control from the left-hand navigation menu
The left-hand navigation menu offers a quick way to create a new control without navigating through multiple screens. By clicking the + Add New icon and selecting Control, users are taken directly to the Control Details page to enter all relevant information. This method is ideal when you need to log a control on the fly, especially if you are already working in a different module and want to add it without leaving your current workflow.
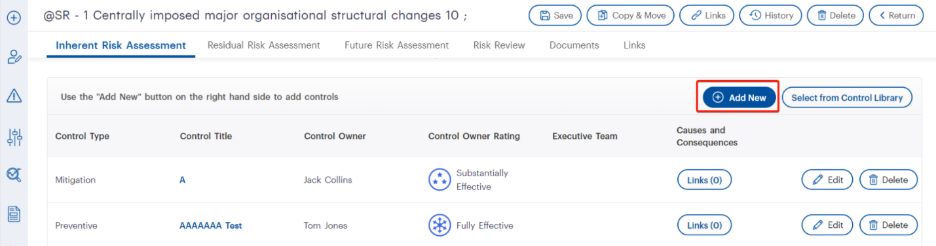 Fig 1.2: Adding a new control from within a risk record
Within a risk record’s Risk Assessment tab, you can add a new control by clicking the Add New button in the Controls section. This opens the Control Record Detail window, allowing you to input details specific to that risk. You can also choose Select from Control Library to link an existing control. This method ensures that controls are directly tied to the relevant risk, making it easier to track their effectiveness in context.
Fig 1.2: Adding a new control from within a risk record
Within a risk record’s Risk Assessment tab, you can add a new control by clicking the Add New button in the Controls section. This opens the Control Record Detail window, allowing you to input details specific to that risk. You can also choose Select from Control Library to link an existing control. This method ensures that controls are directly tied to the relevant risk, making it easier to track their effectiveness in context.
Master vs Risk/Obligation-Level Controls
Why it matters:
Control Details Tab – Master Controls
Fill in the essentials:
Outcome: Clear accountability and a timeline for regular review — no more “set and forget”.
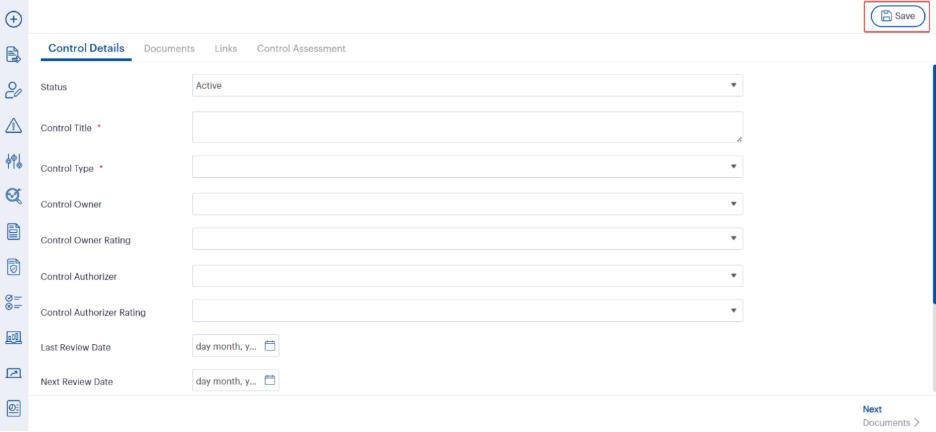 Fig 2.0: The Control Details tab
The Control Details tab captures all key information about a control, including its status, title, type, owner, ratings, and review dates. Mandatory fields, such as Control Title and Control Type, must be completed before saving. This tab ensures that every control has clear ownership, a defined purpose, and scheduled reviews, helping maintain accountability and alignment with organisational governance processes. Once saved, you can proceed to the Documents or Links tabs to add supporting evidence or linkages.
Fig 2.0: The Control Details tab
The Control Details tab captures all key information about a control, including its status, title, type, owner, ratings, and review dates. Mandatory fields, such as Control Title and Control Type, must be completed before saving. This tab ensures that every control has clear ownership, a defined purpose, and scheduled reviews, helping maintain accountability and alignment with organisational governance processes. Once saved, you can proceed to the Documents or Links tabs to add supporting evidence or linkages.
Documents Tab
Attach policies, procedures, training material, or video evidence (up to 10MB). URL links are supported for cloud-hosted content.
Industry benefit: In finance, linking the latest AML policy directly to the relevant control means auditors have instant evidence.
 Fig 3.0: The Documents tab
The Documents tab allows you to attach supporting evidence to a control, such as policies, procedures, or training materials. By clicking the Add New button, you can upload a file (up to 10MB) or link to an online resource. This feature ensures that each control has easy access to relevant documentation, making it simple for auditors, compliance teams, or operational staff to review the evidence that supports its implementation and effectiveness.
Fig 3.0: The Documents tab
The Documents tab allows you to attach supporting evidence to a control, such as policies, procedures, or training materials. By clicking the Add New button, you can upload a file (up to 10MB) or link to an online resource. This feature ensures that each control has easy access to relevant documentation, making it simple for auditors, compliance teams, or operational staff to review the evidence that supports its implementation and effectiveness.
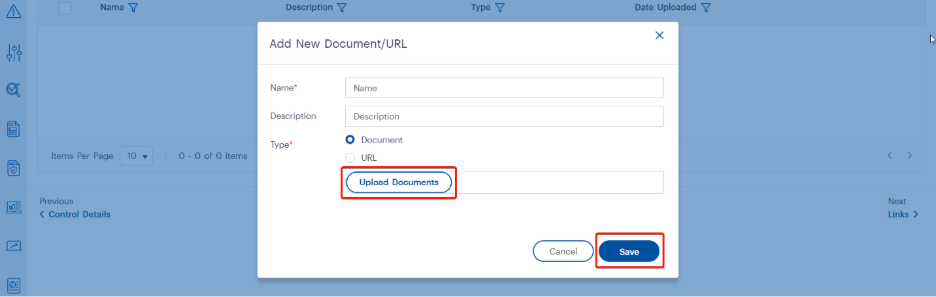 Fig 3.1: Adding a new document to a control
When adding a new document, enter a Name and optional Description, then choose the document type. Selecting Document enables the Upload Documents button, allowing you to attach files up to 10MB in permitted formats. After uploading, click Save to store the file against the control. This process ensures all relevant evidence, such as policies or procedure manuals, is easily accessible from within the control record.
Fig 3.1: Adding a new document to a control
When adding a new document, enter a Name and optional Description, then choose the document type. Selecting Document enables the Upload Documents button, allowing you to attach files up to 10MB in permitted formats. After uploading, click Save to store the file against the control. This process ensures all relevant evidence, such as policies or procedure manuals, is easily accessible from within the control record.
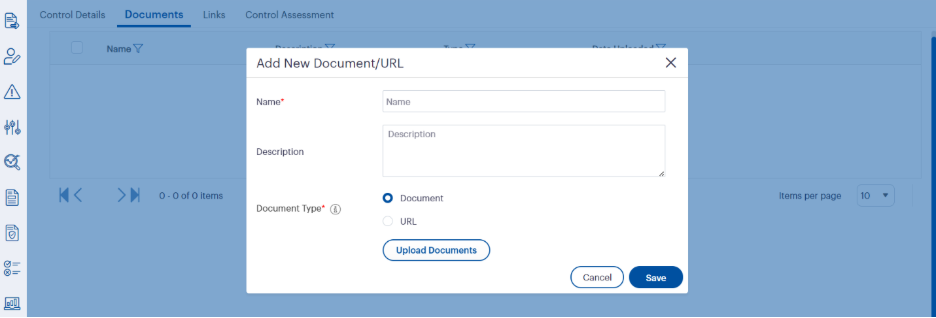 Fig 4.2: Adding a URL as a document type
When selecting URL as the document type, you can link directly to an online resource instead of uploading a file. Enter a Name and optional Description, choose the URL option, and provide the link in the designated field. Clicking Save stores the link against the control, allowing quick access to cloud-based documents, online policies, or other web resources without needing local file storage.
Fig 4.2: Adding a URL as a document type
When selecting URL as the document type, you can link directly to an online resource instead of uploading a file. Enter a Name and optional Description, choose the URL option, and provide the link in the designated field. Clicking Save stores the link against the control, allowing quick access to cloud-based documents, online policies, or other web resources without needing local file storage.
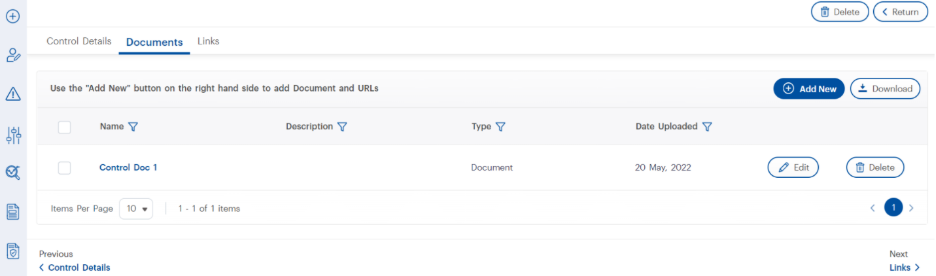 Fig 4.3: Managing existing documents in a control
Once documents or URLs are added to a control, they appear in a list view showing the name, type, and date uploaded. From here, you can Edit to update details, Delete to remove an item, or select and Download attached documents in bulk. This centralised document management ensures all supporting evidence for a control is easy to maintain, update, and retrieve when needed.
Fig 4.3: Managing existing documents in a control
Once documents or URLs are added to a control, they appear in a list view showing the name, type, and date uploaded. From here, you can Edit to update details, Delete to remove an item, or select and Download attached documents in bulk. This centralised document management ensures all supporting evidence for a control is easy to maintain, update, and retrieve when needed.
Links Tab
Associate a control with entities like Risk, Policy, Compliance, Incident, Audit, or KPIs.
Webinar highlight: Linking incidents where a control has failed gives control owners immediate visibility and creates a closed feedback loop between operations and governance.
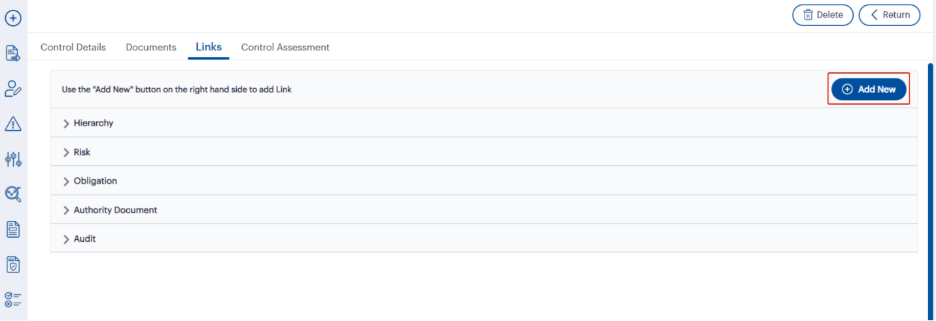 Fig 5.0: The Links tab
The Links tab allows you to connect a control to related entities such as hierarchy levels, risks, obligations, authority documents, audits, and more. Clicking Add New opens the linkage creation process, where you can select the entity type and choose the specific record(s) to link. This feature helps maintain a clear relationship between controls and the operational or compliance areas they support, ensuring visibility across interconnected processes.
Fig 5.0: The Links tab
The Links tab allows you to connect a control to related entities such as hierarchy levels, risks, obligations, authority documents, audits, and more. Clicking Add New opens the linkage creation process, where you can select the entity type and choose the specific record(s) to link. This feature helps maintain a clear relationship between controls and the operational or compliance areas they support, ensuring visibility across interconnected processes.
 Fig 5.1: Creating a new linkage for a control
When adding a new linkage, select the entity type from the Create a New Linkage dropdown — options include hierarchy, risk, treatments, obligations, policy, authority document, and more. Based on your selection, the interface will display relevant records for you to choose from. Additional filters, such as search fields or dropdowns, make it easy to narrow down results. After selecting the desired records, click Save to establish the linkage.
Fig 5.1: Creating a new linkage for a control
When adding a new linkage, select the entity type from the Create a New Linkage dropdown — options include hierarchy, risk, treatments, obligations, policy, authority document, and more. Based on your selection, the interface will display relevant records for you to choose from. Additional filters, such as search fields or dropdowns, make it easy to narrow down results. After selecting the desired records, click Save to establish the linkage.
 Fig 5.2: Viewing and managing linked records
Once a control is linked to other entities, such as treatments or actions, these records appear in a grid within the Links tab. The grid displays key details including title, type, owner, status, dates, and completion percentage. From here, you can filter results, add new links, or delete existing ones. This view provides a clear, organised summary of all connections a control has within the system, helping maintain visibility across related activities.
Fig 5.2: Viewing and managing linked records
Once a control is linked to other entities, such as treatments or actions, these records appear in a grid within the Links tab. The grid displays key details including title, type, owner, status, dates, and completion percentage. From here, you can filter results, add new links, or delete existing ones. This view provides a clear, organised summary of all connections a control has within the system, helping maintain visibility across related activities.
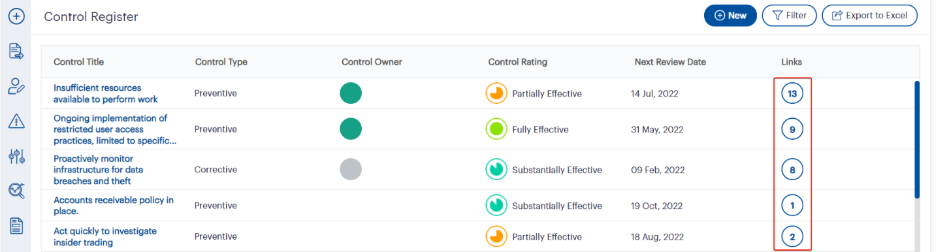 Fig 5.3: Viewing the number of linkages in the Control Register
In the Control Register, the Links column displays the total number of linkages associated with each control. Clicking on the number opens a detailed view of all linked entities, making it easy to review connections without navigating into the control record itself. This quick-access feature provides instant visibility into how extensively a control is integrated across your organisation’s governance framework.
Fig 5.3: Viewing the number of linkages in the Control Register
In the Control Register, the Links column displays the total number of linkages associated with each control. Clicking on the number opens a detailed view of all linked entities, making it easy to review connections without navigating into the control record itself. This quick-access feature provides instant visibility into how extensively a control is integrated across your organisation’s governance framework.
 Fig 5.4: Viewing linked entity details
Clicking a link count in the Control Register opens a detailed view of all associated entities for that control. In this example, the control is linked to multiple authority documents, with key details such as code, title, type, responsible officer, and priority clearly displayed. From here, you can review each linked record, or remove them individually using the Delete option. This functionality provides transparency into the specific governance artefacts connected to each control.
Fig 5.4: Viewing linked entity details
Clicking a link count in the Control Register opens a detailed view of all associated entities for that control. In this example, the control is linked to multiple authority documents, with key details such as code, title, type, responsible officer, and priority clearly displayed. From here, you can review each linked record, or remove them individually using the Delete option. This functionality provides transparency into the specific governance artefacts connected to each control.
Control Record Details within a Risk
Add controls directly in the Risk module:
Example: In healthcare, a “Cold Chain Storage” control might be linked to both vaccine storage and pharmaceutical logistics risks, but with different review intervals.
 Fig 6.0: Adding a new control in the Control Record Grid
Within a risk record’s Risk Assessment tab, scroll to the Controls section to view existing controls and their details, such as title, type, owner, ratings, and review dates. Clicking Add New opens a form to create a new control specific to that risk, ensuring it is tracked and maintained in the context of the identified risk.
Fig 6.0: Adding a new control in the Control Record Grid
Within a risk record’s Risk Assessment tab, scroll to the Controls section to view existing controls and their details, such as title, type, owner, ratings, and review dates. Clicking Add New opens a form to create a new control specific to that risk, ensuring it is tracked and maintained in the context of the identified risk.
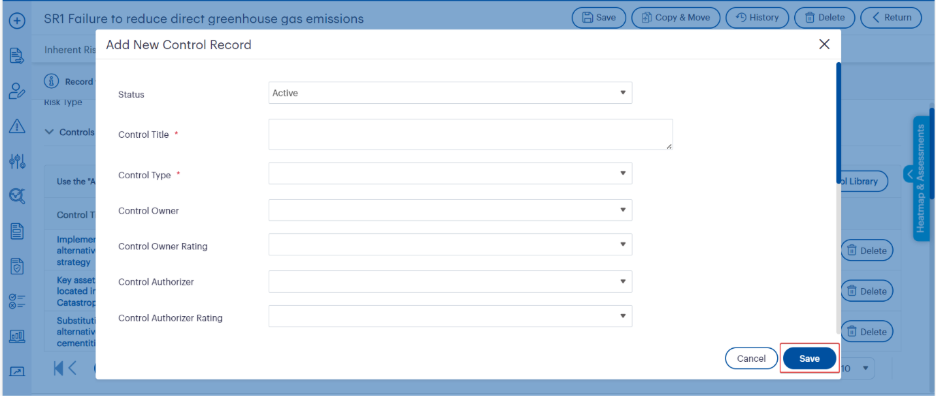 Fig 6.1: Filling in the new control record details (Dynamic Control)
When creating a new control within the Control Record Grid, complete mandatory fields such as Control Title and Control Type, along with optional details like owner, ratings, and authoriser information. Once all required fields are filled, click Save to add the control to the risk record. This ensures each control is properly documented and linked to its relevant risk context.
Fig 6.1: Filling in the new control record details (Dynamic Control)
When creating a new control within the Control Record Grid, complete mandatory fields such as Control Title and Control Type, along with optional details like owner, ratings, and authoriser information. Once all required fields are filled, click Save to add the control to the risk record. This ensures each control is properly documented and linked to its relevant risk context.
 Fig 6.2: Editing or adding more details to a control record
After adding a control to the Control Record Grid, you can click on its title or use the Edit button to open the control record. From here, additional information such as actions, documents, and links can be added to enhance the control’s context and traceability within the risk record.
Fig 6.2: Editing or adding more details to a control record
After adding a control to the Control Record Grid, you can click on its title or use the Edit button to open the control record. From here, additional information such as actions, documents, and links can be added to enhance the control’s context and traceability within the risk record.
 Fig 6.3: Editing and saving additional control details
After opening a control record from the Control Record Grid, you can add or update further details such as executive team assignment, additional ratings, and linked actions. Once all changes are made, click Save to ensure the updated information is stored. This step enhances the completeness of the control record, ensuring all relevant attributes are documented for audit and governance purposes.
Fig 6.3: Editing and saving additional control details
After opening a control record from the Control Record Grid, you can add or update further details such as executive team assignment, additional ratings, and linked actions. Once all changes are made, click Save to ensure the updated information is stored. This step enhances the completeness of the control record, ensuring all relevant attributes are documented for audit and governance purposes.
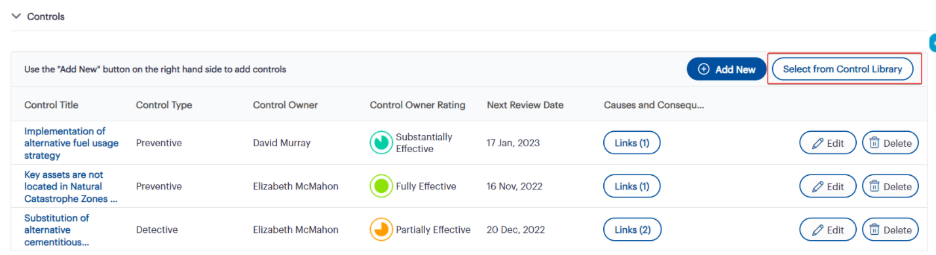 Fig 6.4: Selecting controls from the Control Library
To link an existing control from the Control Library to the current Risk record, click the Select from Control Library button. This opens a list of all available controls that can be associated with the current risk without creating a duplicate record.
Fig 6.4: Selecting controls from the Control Library
To link an existing control from the Control Library to the current Risk record, click the Select from Control Library button. This opens a list of all available controls that can be associated with the current risk without creating a duplicate record.
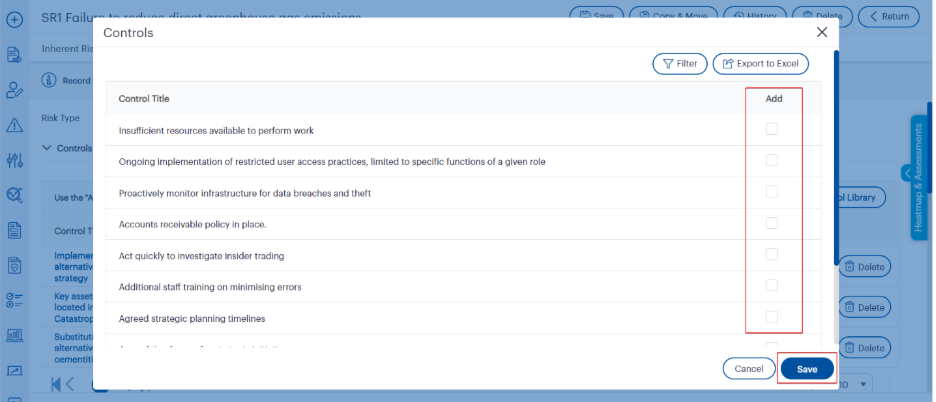 Fig 6.5: Selecting and saving controls from the Control Library
Tick the checkbox in the Add column for each control you want to link to the current Risk record. Once selections are complete, click Save to link the controls. The selected controls will then appear in the Controls list for the Risk, maintained independently from the library record.
Fig 6.5: Selecting and saving controls from the Control Library
Tick the checkbox in the Add column for each control you want to link to the current Risk record. Once selections are complete, click Save to link the controls. The selected controls will then appear in the Controls list for the Risk, maintained independently from the library record.
Learn how to structure your risk register so controls deliver real impact in our upcoming webinar “Risk Register Essentials: Learn, Configure, and Optimise.”
Tangible Outcomes You Can Expect
Want to see this in action? Join our upcoming webinar, “See the Bigger Picture: Unveiling Our Latest Power BI Dashboards,” where we’ll show how to transform control and risk data into real-time, visual insights that drive confident decisions.
Whether you’re starting from scratch or overhauling an outdated control framework, Riskonnect’s Customer Success Engineers can help you:
As highlighted in the webinar, our team can also guide you through upcoming enhancements like nested controls and unified actions (coming 2026), so your control environment remains future-ready.
Ready to Put Control Management into Action?
If you are ready to start building a stronger, smarter control framework, here is how to take the next step: